| Last Update | |
| Created | 24 March 15 |
| Products | WP Plugin,White Labels,Mobile Apps,B2B Software,Trip Composer,Corporate/Self Booking Tool |
| Documentation | Well Documented |
| FAQs | Travel API Integration,Hotels API Integration,Flights API Integration,Payment Gateway Integration |
-

HTML Template Designs
Save Time With Pre-Made HTML Templates
-

WordPress Travel Plugin
The ultimate solution to enhance your WordPress website
-

Crossplatform Widgets
Integrated travel booking features in your existing site
-

White Label Travel Portal
Predefined HTML Templates to Build Stunning Travel Websites
-

B2B Travel Software
Offer a platform to your agencies to book and sell travel services.
-

Travel Agency APP Builder
Create your own Mobile APP and host it on your Play Store.
-

Itinerary BuilderNEW
Create Amazing Itineraries. In A Few Minutes.
-

Corporate Booking Tool
Let your business travelers book and manage their trips online.
-

Travel XML APIs
Have something unique in mind? Take total control!
-

Travel Marketplace
Platform for your agencies to buy and sell FD/Series allotments.
-

GDS/OTA Solutions
Best for IATA travel agencies with direct contracting.
-

Travel Chatbot
Chatbot service offers a convenient for travelers.
-

Testimonials
Voices That Speak Our Success Story
-

Gift Cards and Loyality
Launch a Loyalty Program, Store Credit & Rewards.
-

Documentations
Key aspects of adivaha's travel technology offerings
-

Blogs
Travel Portal Solutions - Travel Technology News and Updates
-

FAQ-Frequently Asked Questions
Ask your questions here!
Cross-Platform Plugins & Widgets
Home » Documentations » Cross-Platform Plugins & Widgets » Setup & Installation
Step-by-Step Guide For You to add Travel Booking feature in your Non-WordPress website
Explore versatile Cross-Platform Travel Widgets compatible with non-WordPress websites. Whether your site is built on Joomla, Magento, C#, Node, React, or Core PHP, this widget seamlessly integrates, offering functionality across diverse platforms and programming languages.
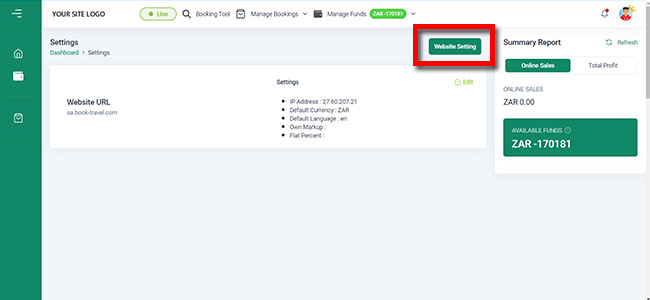
1. Login into your "adivaha® Dashboard" and navigate to "Settings".

2. Then Click on" Website Settings"
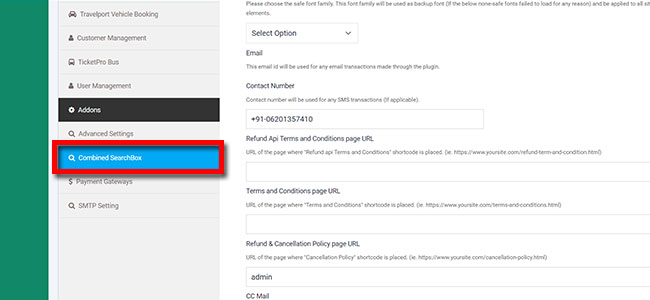
3. Then Click on "Combined Search Box"
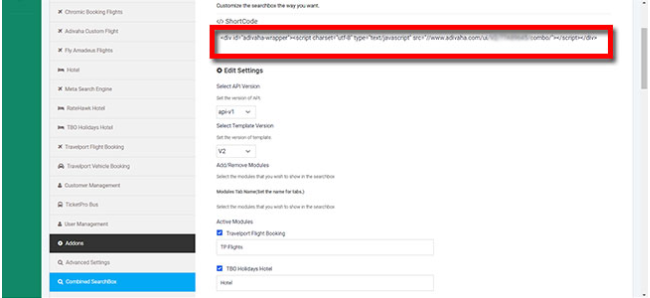
4. Copy "Shortcode For Search Box
5. Paste the copied Short Code "into your home page "Search box" area and upload it to server."
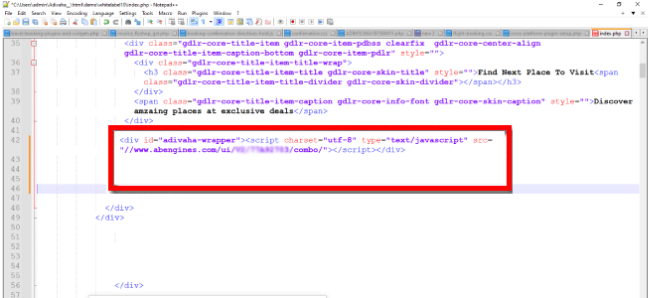
6. Now refresh your home page and you should see the searchbox there.
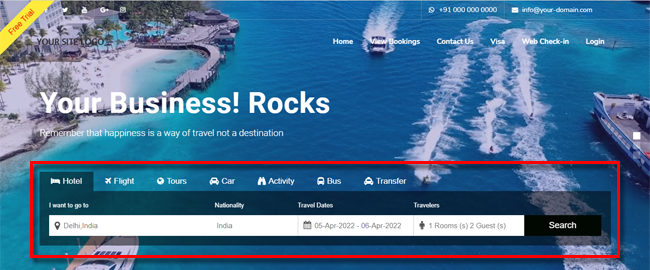
7. Create a i.e search results Page ie. https://your-site.com/search-results.html
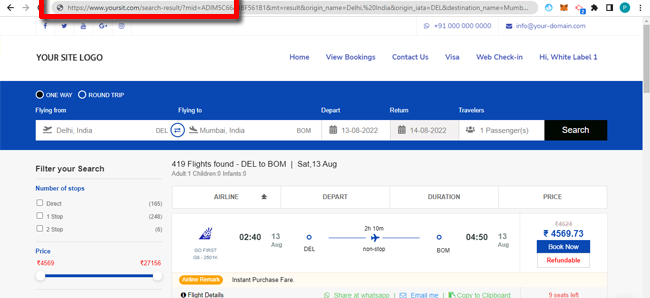
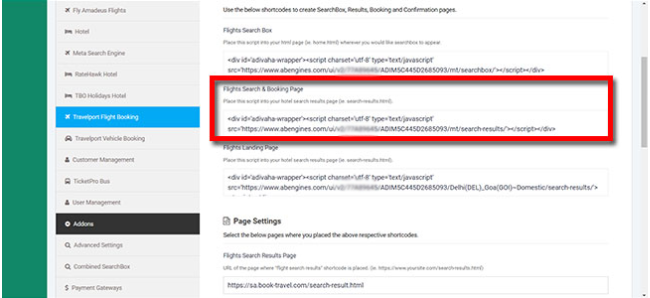
8. Copy the search result Short Code
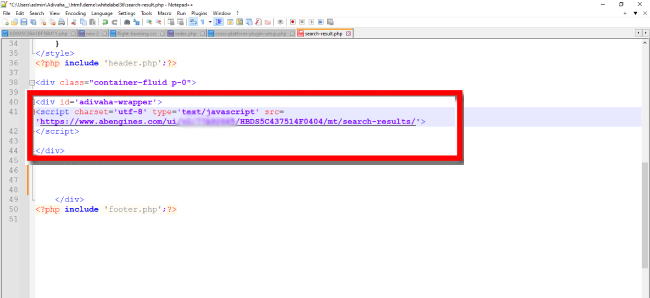
9. Paste the shortcode in your body content area of search results page (full width). ie. https://your-site.com/search-results.html
10. Feed the url of your newly created search result page (ie. https://your-site.com/search-results.html) in the settings page ("Search Result Page Url").
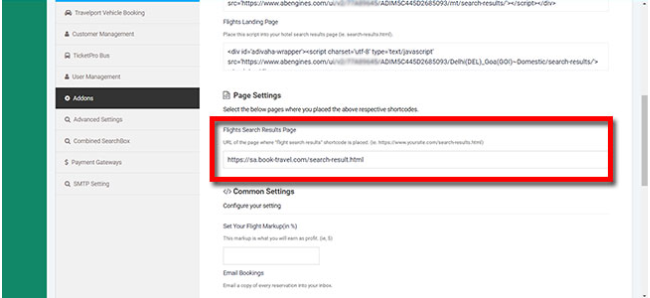
11. Click "Save".
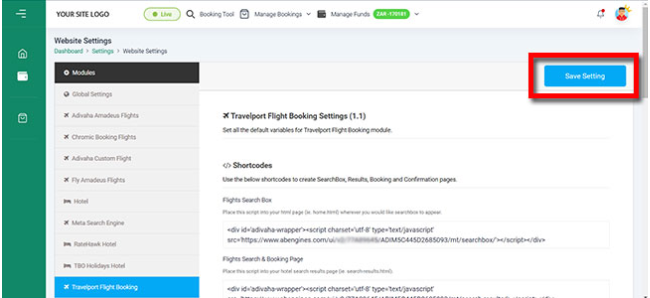
Hurray! you are done! Now try searching for searvices from the home page search box.

- Setup & Installation
- adivaha® Travel Platform
- How It Works
- WordPress Plugin
- White Label Portal
- Cross-Platform Widgets/SDK
- B2B Travel Platform
- Mobile APP Builder
- APP Store
- Manage Wallet
- Load Funds
- Transaction History
- Back Office
- Global Settings
- Change Password
- Go Live
- Upload your logo
- My Bookings / Cancel Bookings
- Manage Profile
- Setting a Markup
- Customize Searchbox
- Custom Styling (CSS)
- Payment Gateway
- SMTP Settings
- Settings
- B2B
- Agency Registration
- Agency Account Activation
- Manage Agency Wallet
- Addons
- SMS Notifications
- Whatsapp Notifications
- Chatbot Settings
- Multicurrency
- Multilingual
- Travel Insurance
- Manage Cashback
- Manage Discount Coupons
- Meals & Baggages (SSR)
- Enable Taxation Module
- Photo Editor
- Geo Location based Currency
- Clubbed Flights
- Hide Passport
- Generate E-Ticket Manually
- Hold Bookings
- Many more ...


